
The Secret Every Vintage Pyrex Collector Uses to Keep It Looking New
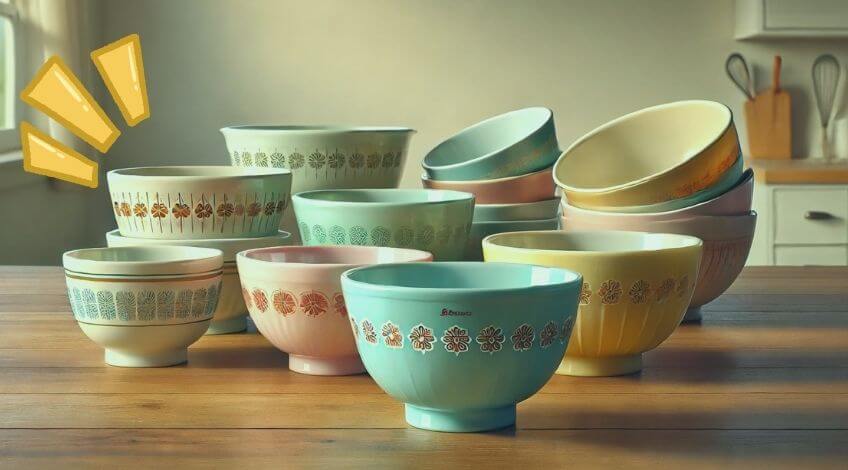
If you’ve ever held a piece of vintage Pyrex and wondered how some collectors manage to keep their dishes looking absolutely pristine whilst others sport scratches and scuffs, you’re about to discover the secret that’s been quietly passed down through collecting circles for years.
The answer isn’t expensive restoration services or complicated techniques. It’s actually a simple polishing paste that most people have never heard of, combined with some clever care habits that prevent damage in the first place.
Whether you’ve inherited Grandma’s collection or you’re hunting for treasures at car boot sales, these proven strategies will help you maintain that gorgeous, like new appearance that makes vintage Pyrex so special.
Understanding What Damages Your Vintage Pyrex
Before we reveal the secret cleaning method, it’s important to understand what causes those frustrating scratches and scuffs in the first place.
Most damage happens during everyday use and cleaning. Metal utensils scraping across the surface, stacking dishes directly on top of each other, and using abrasive sponges can all leave their mark. Even something as simple as sliding your dish across a worktop can create tiny scratches that build up over time.
The good news? Once you know what causes the damage, you can easily prevent it whilst still enjoying your beautiful Pyrex collection.
The Secret Weapon: Peek Polishing Paste
Here’s the secret that serious collectors swear by: Peek polishing paste. This mildly abrasive cream works absolute wonders on surface scratches and scuffs, and it’s been the go to solution for restoring vintage Pyrex for decades.
What makes Peek so special? It’s designed to remove oxidation and surface damage whilst leaving a protective coating that lasts about three months. The paste is gentle enough not to damage the coloured coating of your Pyrex, but effective enough to buff away those stubborn marks that regular washing can’t touch.
What You’ll Need For The Peek Method
- Your scratched Pyrex dish
- Peek polishing paste
- Microfibre cloths (keep them damp)
- Washing up liquid
- Warm water
Step By Step Restoration Process
Step 1: Start With A Thorough Clean
Wash your Pyrex dish with warm water and washing up liquid. Give it a good scrub with a soft sponge to remove any food residue or general grime. The scratches that remain after this thorough wash are what we’re going to tackle.
Step 2: Rinse And Dry Completely
Make sure your dish is completely clean and dry before applying the Peek paste. Any leftover soap or moisture can interfere with the polishing process.
Step 3: Apply The Peek Paste
Using a damp microfibre cloth, apply a small amount of Peek directly to the scratched area. You don’t need much: a little goes a long way with this stuff!
Step 4: Polish In Circular Motions
Immediately start buffing the area using gentle circular motions. Don’t let the paste dry on the surface, as this can make it harder to work with and potentially less effective.
Step 5: Rinse And Inspect
Wash off the paste thoroughly and dry your dish. You should see a dramatic improvement in those scratches and scuffs!
Alternative Methods That Work Well
If you can’t get hold of Peek paste immediately, there’s another household favourite that works well: Bar Keepers Friend Soft Cleanser.
Apply the cleanser to your scratched Pyrex and let it sit for 10 to 15 seconds. Scrub gently with a damp cloth, then rinse and repeat if necessary. Whilst it’s not quite as effective as Peek for deep scratches, it’s excellent for general maintenance and light surface marks.
What About Deep Scratches?
It’s important to set realistic expectations. If your Pyrex has deep scratches that penetrate through the coloured coating down to the glass beneath, unfortunately these are likely permanent. Both Peek and other polishing methods work on surface level damage, not gouges that go through multiple layers.
For dishes with deep damage, your best bet is to check the model number and hunt for a replacement on sites like eBay or at antique shops. Sometimes it’s worth keeping the damaged piece for decorative purposes or less visible storage uses.
Prevention Habits That Keep Your Pyrex Perfect
The real secret isn’t just knowing how to fix scratches: it’s preventing them in the first place. Here are the habits that serious collectors use to keep their pieces looking new.
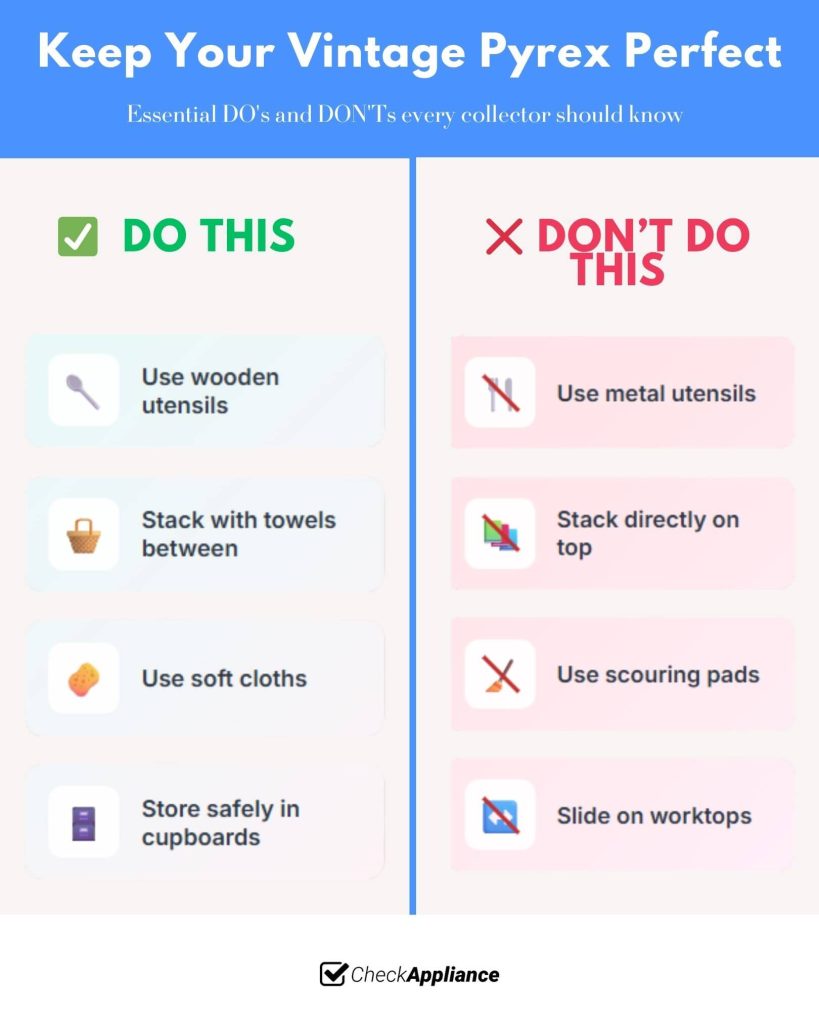
Use The Right Utensils
Wooden and silicone utensils are your Pyrex’s best friends. Metal spoons, spatulas, and serving utensils can easily scratch the surface, especially when you’re stirring or scraping. Keep a set of wooden spoons specifically for use with your vintage pieces.
Master The Art Of Stacking
Never stack Pyrex dishes directly on top of each other. Place a soft tea towel or paper towel between each piece when storing. This simple habit prevents the bottom of one dish from scratching the surface of another.
For displaying your collection, consider using plate stands or spacing pieces apart on open shelving. Not only does this prevent damage, but it also shows off your beautiful patterns much better!
Choose Your Cleaning Tools Wisely
Microfibre cloths and soft sponges only. Those green scouring pads might seem tempting for stubborn spots, but they’ll create tiny scratches across your Pyrex surface. For baked on food, soak the dish in warm soapy water first to loosen everything up.
The Gentle Washing Technique
When hand washing (which is always preferable for vintage pieces), use warm rather than hot water. Extreme temperature changes can stress the glass and potentially cause cracking. Add your washing up liquid to the water rather than squirting it directly onto the dish.
Smart Storage Solutions
Store your Pyrex in cupboards where it won’t get knocked about. If you’re keeping pieces you use regularly on open shelves, make sure they’re well away from the edge where they might get bumped.
Consider investing in some felt lined drawers or padded storage boxes for your most precious pieces. It might seem excessive, but for rare patterns or sentimental pieces, this extra protection is worth it.
Quick Fixes For Common Pyrex Problems
Even with the best care, accidents happen. Here are some quick solutions for the most common issues:
- White Film Or Cloudiness? This is usually mineral deposits from hard water. A vinegar solution (equal parts white vinegar and water) left to sit for 15 minutes usually sorts this right out.
- Stubborn Food Residue? Make a paste with bicarbonate of soda and water. Let it sit on the stuck on food for 20 minutes, then scrub gently with a soft brush. The slight abrasiveness helps lift food without scratching.
- Grease Marks? Dawn washing up liquid is particularly good at cutting through grease. For really stubborn marks, let the soapy water sit in the dish for a while before washing.
When Professional Restoration Makes Sense
For extremely valuable or sentimental pieces with significant damage, you might want to consider professional restoration. Some specialists can work wonders with badly damaged Pyrex, though this service can be expensive.
Before going down this route, research the value of your piece. Sometimes the cost of professional restoration exceeds the value of finding a replacement, unless the piece has special sentimental value.
Your Pyrex Will Thank You For These Simple Steps
The secret to keeping vintage Pyrex looking new isn’t really a secret at all: it’s just a combination of the right products and consistent care habits. Peek polishing paste can work miracles on scratched surfaces, but preventing damage in the first place with gentle handling and proper storage makes the biggest difference.
Remember, these beautiful dishes were made to be used and enjoyed, not hidden away. With these techniques, you can confidently cook, serve, and display your collection knowing it will stay gorgeous for years to come.
Share these tips with fellow Pyrex enthusiasts in your local collecting groups or online communities. After all, there’s nothing quite like helping someone restore a beloved piece to its former glory!
SEE ALSO: Should You Wash Mushrooms? The Answer Might Surprise You
Also, follow us on Pinterest ...


